Pages

Thursday, July 18, 2013

So You Want to Plan a Meetup!


Lolita meetups can be so much fun!  Whether you are just planning a get together at a private, or public location.  It gives you a chance to meet new friends or just spend time with old ones.   Events can take place at a tea house, museum, amusement park (that one might not be too practical, but it's been done before), or even your own home.

There are steps that you have to take, and these are the same with ANY event, not just a Lolita Meet.  To make this more comprehensive, I am planning on creating an event soon and I will use my event as an example.

Step 1:  When and Where?

I have recently decided that I want to have a get-together at my house, in the Fall.  Specifically, a Sunday brunch in my backyard.  I choose my house since we have an out door bar, tables, and plenty of seating.  Aside from the back yard, we will also have access to the front yard for games, and the basement, should the weather not be ideal..  Since it is still summer time, I am providing enough time to get money together and plan my party.  If I can send out my invitations early, this will also give my guests to make arrangements to come if they need to request off work.

Step 2:  How many people do you plan on inviting, should you just invite the whole Lolita community or select people?

There is limited space at the event I am planning.  As much as I would love to invite the whole community there just would not be enough room  if every member of the community rsvped (imagine all the petties XD).  By limiting people this can also help give me an idea of what my budget will look like.  We will get into that more later.  For now I am looking to invite between 10-15 people.

If your event is public, like going to a museum or to the movies, inviting the whole community should be fine as long as there is not a limit to how many people can occupy that building or place (and that if every single person in your community goes you do not have to worry about exceeding a limit).  The most Lolita's I have seen at a event where everyone was invited, was around 20-25 people.  Each community varies in the amount of members, and not everyone can attend to the same meetup, be it because of work, money, or transportation.

For those of you wondering about invitations, I am simply just going to create a Facebook event.  If I had everyone's addresses I would send out regular invitations.  That may be something I look into doing in the future.

Step 3:  Food.  What are your options?  What are you serving?


If you have the time and money you can provide all the food, or you can make a potluck (example: photo above) and everyone can bring something.  By doing a potluck you do save a lot of money on food and you don't have to worry about spending all of your time in the kitchen.  For me personally, I plan on trying to provide all the food and drink so that it is more convenient for my guests, but if someone indicates that they want to bring something that is fine by me.

Since I plan on doing a brunch, I need to think of what food I want to serve.  When I make my event, I will ask people for suggestions on food, mostly because some people are vegetarians, and they may not be able to eat everything that I plan on providing.  There are also people who just wont eat certain things, whether they are vegetarians or not.


Freshly made Waffles
Toast
Muffins
Scones
Suggage and Bacon
Eggs
potatoes/hasbrowns
Cut Fruit
Condiments: Jam/Jelly, syrup, whip cream, powered sugar, butter, Ketchup... people like to put it on their hasbrowns.

Drinks: Various Tea, Orange Juice, Milk, Water, and Mimosa's for those 21 and older. If you plan on having alcohol at a Lolita event, and underage members of your community are going to be there, you need to ask to see ID.  If you are worried about hurting feelings or singling people out, you need to remember that if you give an underage person an alcoholic beverage then you can do jail time.  Not to mention if something happens to said person who takes that drink from you, you will be seen at fault and then be put under further penalties.

Now that I have my menu, I have to think about some important things.  How much food should I make?  What can easily be made the night before and still be good the next day?  Anything that requires baking will be made the night before, such as the muffins and scones.  I could cut the fruit the night before as well, or I can get up early enough to cut it before everyone gets to my house.

Step 4: Theme (if any), Decorations, Plates and silverware.


This is the part where I have the most fun!  So I am planning this Brunch in the Fall.  So any decorations I get will be specifically Fall themed (not Halloween, even though I do love Halloween parties!)  This is just the planning stage, so I may or may not get all of the items listed.

Fall flowers
pumpkins and gourds 
Birds and birdcages
Balloons
Ribbons
Fall themed plates, cups, and plastic silverware.
Table cloths

If you plan on having games, you can also make prizes for each winner.  The most expected game would probably be croquette, but you could get a ring toss or bean bag game as well, something that wont take too much room and is easy to set up and break down.  That being said, you can break out the Wii and play Wii bowling!  I'm not sure if I will have prizes or not.  This all depends on if there is time.

Step 5: The Budget.



Review steps 1-4 and decided what you can realistically do and what needs to be cut.  It's easy to get caught up in the idea of what you want your event to be, but the outcome can end up being more subtle than you expected.

The following are places that I plan on looking for decorations.  Some places do provide coupons, so if there is something that you want, but you need to save a couple of dollars, check online for coupons and promotions.

For Party Decorations:
Joanns
AC Moore
Michael's
Party City
Oriental Trading Company
Dollar Store

Food and Drink:
Local Grocery Store

Honestly I want to avoid getting something from the Dollar store, but sometimes they surprise you with what they have!  Its also a good place to go to spread your money should you be coming up short.  The majority of my money will probably be going towards food.


Well, that's my plan so far!  If I missed anything, or if you guys have any questions, please post them in the comments below!  Don't forget to subscribe.  Hopefully I will be having this party towards the end of September and I will do a follow up on that.

Thursday, July 11, 2013

Lolita Taboo

Today’s Lolita Taboo is all about Cosplay With Lolita.

Recently I was asked if I wanted to appear on my friend’s YouTube channel, which I cannot give the information out yet because the episode is a secret.  I will update everyone once the video is up and include all of their information.  They want me to talk about Lolita.  On their channel they discuss comic books, anime, video games, cosplay, and the conventions they plan on attending.  I have cosplayed in the past but never made my own costume before.  For my friend’s channel I want to keep it relevant to their audience, so I decided I would go over the basics of Lolita, and talk about using Lolita for cosplay.

There are arguments about whether or not you can call a Lolita inspired cosplay, Lolita.  Some say yes because it is still called Lolita and has the poofy skirt, headdress, all the making of a regular Lolita coord.  Others say no because it is still a costume of a character, and when you look at the outfit, you just see the character in a Lolita Style.  More often than not, if you see a cosplay online that has a Lolita style to it, it probably has a #Lolita tag and a #Cosplay tag, but does that make it both?

For me personally, I would call costumes like these Lolita inspired, but its not something I would wear outside of a convention or costumed event, because in my mind it is a costume.  I always find other Lolita’s who really don’t like mixing the fashion with cosplay or trying to even remotely emulate a character through Lolita.  The reason being is that we as a fashion community already go through a lot when we try to explain to other’s that our fashion is just that; a fashion.  Once you add cosplay into the mix, the line between fashion and costume becomes blurred.

Cosplay Lolita is when someone takes a character from an anime, cartoon, TV show, Movie, Book, or any fandom and creates a Lolita outfit around them.  They keep as much detail as possible to the character’s original design however; the Wearer has decided to give the costume a Lolita look.

Here I found a picture where someone was cosplaying as the character on the left, and a girl decided to make a Lolita styled cosplay of the same character. The character is originally male, and so the cosplayer on the left decided to make a female version of this character.  It is perfectly acceptable to make a female version of a male character, however if you want your cosplay to be Lolita as well then there are guidelines that have to be followed.  Simply putting a little tag and calling it Lolita, doesn’t mean it actually is.  This cosplay is cute, however I don’t feel that it is Lolita.


Here is a good example of a Cosplay Lolita that is strongly leaning towards the character.  I feel that this particular Cosplayer used the correct components to call this Cosplay Lolita.  This girl is one of the Lolita’s in my community and online she goes by the name of Kinara-Hime.

Kinara has made a Lolita Harley Quinn.  Two of my favorite things in one!  You can imagine how excited I was to see this.  The skirt is bell shaped and it is at a flattering length, reaching the knees.  She opted for a plain white blouse that helped to balance the strong colors of the red and black.  I like that her hair bow matches her tights, and that she added the red bag and chose to wear red shoes.  I think that anyone looking at this would recognize it as Lolita, but you can also see the character.

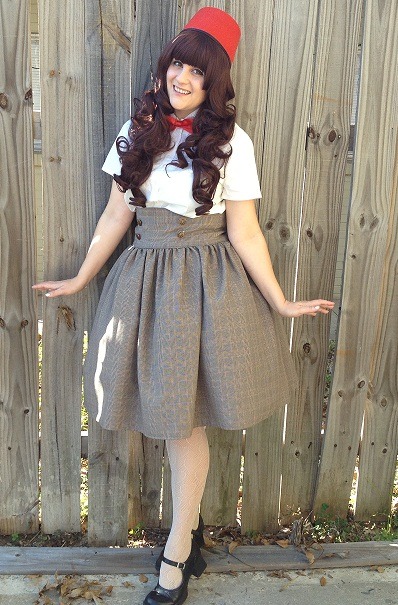
Another Cosplay Lolita is when it only hints to being the character.  This can be done by using colors, accessories, and fabrics.  Such as this Doctor Who Cosplay.  The skirt and blouse makes for a good Classic Lolita look, however once you add the Fez and bowtie, its easy to recognize the character.  Other ways of doing a subtle Cosplay Lolita is by keeping your outfit to a theme, and this is something fun you can do in a group.  Example: dressing as the Disney Princesses, but everyone just wears a coord that is the same color as the princess they are dressed as, or wear prints that would match.

The best time to wear any Lolita Cosplay is at a convention where dressing up is encouraged.  You can also wear your Lolita Cosplay at an event such as a costume party, or if you are a part of a cosplaying community and someone is holding a meetup.  You could plan a photo shoot with friends to take pictures.  If you get some images out of the shoot that you like, you can display them online (and I might find them and put them on my blog, credit given to where it is deserved). Wearing a Cosplay Lolita at a regular Lolita meet up is frowned upon, and not appropriate at a un-costume themed event.


The most important thing about any Cosplay, is to have fun!  If you are planning a Cosplay Lolita, just remember that it should read as Lolita first and Cosplay second.  If you are not sure, just take a step back and ask yourself if the cosplay meets the anatomy of a Lolita coord?  Then ask yourself if the character you are trying to portray is still recognizable?  Have fun, and I hope this was informative and helpful.

If you would like to see more of Kinara-Hime's Cosplays, please visit her Facebook page.  If you have any Cosplay Lolita you would like to show, please comment with a link at the bottom!

https://www.facebook.com/KinaraHime?fref=ts

PS.  Thanks to my friend for all the assistance and editing :)

Thursday, July 4, 2013

Innocent World Review

Happy July 4th/Independence Day to all the American Lolitas!  And for those of you who do not reside in the USA, I still wish you a happy day too :)

As I mentioned in my previous blog posts, I want to start making regular posts and making sure that they are relevant to Lolita.  I recently got my first brand items, its only two, but I am going to talk about these pieces anyway and about my overall experience from purchase to receiving and trying on the items.

Innocent World had a huge sale in June, and I decided to take advantage of that!  They had items that were 70% off.  I placed an order with a friend, and I got familiar with their order form.  IW’s order form makes it pretty easy to complete.  After I submitted the form, I was contacted by someone from IW, letting me know that they got my order, however one of the items were sold out and they gave me the opportunity to select something else that I wanted.  They were very polite and I was happy that they got back to me so promptly.

The wait was a little over a week.  Nothing was damaged and as soon as I got home I opened it!  Each item had its own plastic garment bag, with a hanger, and was neatly packed into 1 plastic Innocent World Shopping bag.  Inside a bag was a letter, thanking me for my purchase and that they hope to do business with me in the future.  

For myself I purchased a Hemming Checkered JSK in green, and my friend bought one in Grey.  The second item I got myself was the Tailored Salopette in Chocolate.  The dress fits pretty well on me, however the Salopette just barely fits, and that is mostly due to the length, as I am tall and have a long torso.  There are some things that I can do to possibly fix the garment, but I am honestly not sure if I want to tamper with this item.


The first thing I noticed about the JSK was the feel of the fabric.  It is not bulky or coarse as some of my off brand items, and the JSK is fully lined.  Once I put the dress on, I realized that the straps are changeable, and I could wear them normally, crisscrossed, or just tie the straps behind my neck.  The shirring also provided extra room if needed.  Overall I am very happy with this purchase, the only thing I might change would be to make the skirt an inch or two longer, but I was told I could wear a underskirt to help lengthen it.

The Salopette’s material is thicker, but still nice to the touch.  It reminded me of fabrics used for suits.  It took me a minute to find the zipper, which is placed in front and hidden behind the rectangle pieces (I am not sure what those are called).  This garment is also filly lined.  The back has lacing and a bustle back.  I originally wanted this in gray and black, but I am happy with this color.  The garment was a tight fit after I zipped it closed, both around my waist and vertically on my body.  I was able to adjust the straps that were attached on the back (they are removable), but this only eased the vertical strain a little bit.  If it was longer, I wouldn’t have any doubts keeping the garment.  It is very nice and well made, just not the right size for me.  Another thing that I like about this was the pockets!  I didn't realize that the pockets were actually functional until I had the garment on.  That was a cool surprise.


At this time I don’t have any Lolita blouses, socks, accessories, etc to go with these items.  I have some regular button down tops (as you can see in the picture).  I heard that if you have longer arms it is harder to find full length sleeve Lolita tops and blouses that will fit.  Do other tall Lolitas have this problem?  I imagine it would be fairly common.


Overall experience, I am very happy and I plan on buying from Innocent World again.  If you have any questions, or would like to add your previous experience with purchases from Innocent World, please leave your comments below!

Wednesday, June 26, 2013

What has PLV Been Doing?

Hello!

I have been out of the Loop for a bit, I know.  Facebook keeps reminding me I have a blog, and that people actually read it!

I just recently came back from Georgia!  Sadly I was in Georgia AFTER Frill, so I didn't get to go to the convention.  Plans are in the works for the next one, so I am going!  I just need to map out my vacation accordingly.  I will warn you that if I get to go to Disney World, then that trumps Frill.

Anyway, I was in Georgia to meet up with my Harry Potter Crew!  I only wore Lolita 1 day, but I think I picked a good day to wear it, because that is when we went to the Atlanta Historic Center and got to see the Swan House.  The Swan House was built in the 1920's and was owned by the Edward H. Inman Family.  They had actor's who walked around as the architect, interior designer, and the butler.  Each character had information about the house.  The Butler could tell you about his day to day tasks, what it was like to work for the Inman family.  The Interior Designer knew everything about all the furniture and paintings, from where they were purchased from and why, she was even able to tell us about the wall paper!  Honestly we didn't really talk to the architect.  Needless to say, I felt pretty elegant wearing my Lolita Dress at this house.  There was also a farm we went too, where we got to pet some sheep!

http://www.atlantahistorycenter.com/cms/Swan+House/116.html

Aside from that, that was the most lolita-ish thing we did on the trip.  When I came back from Georgia, I met up with other lolita's for some mini golf fun and to see the Monsters University movie... and I mean the day I landed back in Baltimore, I went home, dropped my bags off and changed into my Lolita Dress and ran out! This particular dress is something I recently reconstructed. I had the top from that BTSSB dress, and I made a new bottom and attached it.  I even made a little headdress to go with it!

Other than that, I have been pretty lazy.  I have been trying to make it out to meets and make some new stuff, but with work I have just been feeling really drained, and I am supposed to be starting school again soon, with over time at work!  Why do I keep doing this to myself?

I suppose I should make a better effort to update my blog.  A friend recently gave me some advice, and I think I am going to take it.  That being said, I am going to attempt to update my blog at least once a week!  I will try to shoot for either Tuesday or Thursdays, as those days I get off from work early (more personal information...).  Keep a look out for reviews!  I recently made my first Innocent World purchase, and a purchase from Taobao.  I'm not going to be too critical on the sizes, because I could only go by what the charts online said.  Hopefully everything fits, and if it doesn't I know that I will need either a larger or smaller size in the future.

That's it for now!

-PLV

Friday, May 17, 2013

Fashion Show Pictures

Warning, this is not Lolita related, but it is sewing related!

May 5th, 2013 my school had a Fashion show at the Baltimore City Convention Center.  YAY!  And guess who's designs hit the runway first?

Now I made a total of 8 garments, however 1 of my kid models dropped out.  The pictures I am posting are only of the adult models (4).  These were taken by a friend so they are not a 100% clear.  I was told that there will be a video and I will update everyone when that is up!

As for my previous Brand Chop, I had to give the finished chop to my friend before I could take pictures.  I might ask her to pictures of her wearing it so I can show you how it turned out!  Aside from that, I am going to chop up a replica dress.  Not sure what I am going to make.  I keep leaning towards a jacket, but then I think it would look neat as a corset.  Or I could always have you guys vote and tell me what you want to see!  But lets save that for the next post :)

On with the pictures!


Thursday, May 16, 2013

Re-Posting Hat Tutorial!

Hey people :)

I recently got on Pinterest and I saw someone pinned my Hat Tutorial... and then I remembered when I lasted tried to edit it, things went... bad.

So here is my attempt to re-post this tutorial, and hopefully the pictures will actually match with the steps.  To make this easier I am just going to write out the steps, and then have the pictures one after the other in the order that you see the steps!

I hope that this encourages other people to make their own hats and please send me pictures or post links to them in the comments below! :)

You will need: 2 felt hats.  Glue, preferably fabric glue, but I have used hot glue as well (just be careful with what kind of fabric you are using and test stuff out!), Scissors, Hairclip/comb/ribbon.  Trim of your choice.


Step one.
Take one of your felt hats and scissors.  Start off by cutting the brim of your hat.  Yes, your going to cut your hat into pieces.  After you cut the brim off, make a slit up the side, to the top of the hat.  

Good, now cut the rest of the body of the hat off from the very top of the hat, keeping the top of the hat's circular/oval shape.  So now you have a bunch of hat pieces, right?  This is going to be the pattern you will use for the fabric.  The best part is that after you have cut this one hat up you don't have to cut another one up.  Just keep the pieces and you can make more in the future!

Step two.
After you have chosen your fabric, take the pieces of your cut up hat and proceed to cut your fabric.  Remember to cut the pieces a little larger than your pattern (you can trim it later if needed).  This will insure that your pieces are not too small and that none of the black felt will be visible.

For the brim, I cut two pieces.  One for the top and one for the bottom.  You don't have to do both, its just what I like to do to give a more finished look.  With fabrics that have more give then others, I make the hole on the topside of the brim smaller, where the bottom piece the opening will be the same size as the opening.  The brim on the bottom will be slightly wider than the top piece.  (Hopefully I haven't lost you yet!)


Step three.
Its now time to bring out your glue.  I start with the brim first.  You don't have to, but I think it looks better this way.  Take your uncut hat and apply the glue around the top of the brim.  If using fabric glue, let the glue sit on the hat so that it can get nice and tacky for when you put the fabric on.  Slip the top cover of the brim over the hat and smooth it over the brim, and fold over the extra fabric to the other side of the brim and glue it down.  You can also just cut the fabric if folding it becomes too bulky.  After you have secured your fabric over the brim, again let the hat sit for a while.

This process can be a bit long and tedious, but it is well worth the wait and effort.  After your feel that the glue has dried enough, you can then put the very top piece onto the hat.  Apply the glue on top and them smooth over the fabric.  

The middle section of the hat at this point should still be exposed (except for the bottom of the brim of course).  Take your fabric and glue, and put the glue on the top and bottom edge of the fabric.  Now fold it over so that it looks like you have a clean hem (for those of you who do sew, you can actually hem it!).  After the glue has dried enough on the fabric it is time to go ahead and glue on the middle section.

Your going to wrap the fabric around the hat, making sure that the folded sides are facing into the hat.  One side will over lap the other, this is normal.  This is where I like to do another fold and glue it down, making it appear that there is a seam going up the side of the hat.

Now, if you want to, you can take the bottom brim fabric and fold over the edge, or you can glue the piece on and then trim the edge (I have a feeling pictures are going to make this much easier to understand).  Again, this gives the hat a clean look once you glue the bottom piece.

Step Three is Finally Complete and you now have a fully fabric covered hat!

Step four.
This is where it gets easier.  Before you plug in your glue gun, play around with your trim a bit to find the best look for your hat.  After you have an idea of what you want your hat to look like your ready to start gluing!

Before anything, I like to glue down my ribbon/band around my hat.  After that I will add a bow, flowers, or a pendent to go on the front or side of my hat.  After I have finished with my gluing, sometimes I will add a string of beading onto the hat if I feel that it needs it.  In this tutorial I have chosen a black band, Jeweled black heart, and red feathers.

Step five.
I always add my hair clip or ribbon at the end.  You don't have to go by this example completely, its just how I like to do it.  If you're using a hair clip, I like to make sure that the clip is about the same width as the opening of the hat because the hat will have better support on your head.  I place the clip right in the middle and use the hot glue gun to glue each end of the clip to my hat.  With ribbons you can either sew them in, or glue them.  Its going to be faster and easier to glue, but with sewing you might feel more at ease about how tight you tie your hat on to your head.

And now you have your very own mini top hat!


Wednesday, April 10, 2013

Still Got Legs!

The title doesn't really go with this blog post i don't think, but whovian cares? ;)

Anyway, I am still alive!  I have been working on lots of schoolwork and the fashion show.  YAY!  So if any of you keep up on my Facebook or Twitter, I just got a new Serger!

This is not a long post, this is to just let you guys know I am alive and I will do a serger review after I have finished making my garments for the fashion show.  I will say that I am very happy with my purchase, and it is a Juki brand serger.  It is the same brand we use at school, so that is one of the main reasons why I choose this machine, but also because of the reviews and I wanted something that I could do different things with it.

Anyway, after I fashion show I am going to either post pictures, video, or something...

Okay BYE!!!!!!!!!!

P.S.

You people actually emailed me with some questions!  I'm so excited!  Please don't think I forgot about you, I will make another blog post to address them :)

-PLV