Pages

Friday, May 17, 2013

Fashion Show Pictures

Warning, this is not Lolita related, but it is sewing related!

May 5th, 2013 my school had a Fashion show at the Baltimore City Convention Center.  YAY!  And guess who's designs hit the runway first?

Now I made a total of 8 garments, however 1 of my kid models dropped out.  The pictures I am posting are only of the adult models (4).  These were taken by a friend so they are not a 100% clear.  I was told that there will be a video and I will update everyone when that is up!

As for my previous Brand Chop, I had to give the finished chop to my friend before I could take pictures.  I might ask her to pictures of her wearing it so I can show you how it turned out!  Aside from that, I am going to chop up a replica dress.  Not sure what I am going to make.  I keep leaning towards a jacket, but then I think it would look neat as a corset.  Or I could always have you guys vote and tell me what you want to see!  But lets save that for the next post :)

On with the pictures!


Thursday, May 16, 2013

Re-Posting Hat Tutorial!

Hey people :)

I recently got on Pinterest and I saw someone pinned my Hat Tutorial... and then I remembered when I lasted tried to edit it, things went... bad.

So here is my attempt to re-post this tutorial, and hopefully the pictures will actually match with the steps.  To make this easier I am just going to write out the steps, and then have the pictures one after the other in the order that you see the steps!

I hope that this encourages other people to make their own hats and please send me pictures or post links to them in the comments below! :)

You will need: 2 felt hats.  Glue, preferably fabric glue, but I have used hot glue as well (just be careful with what kind of fabric you are using and test stuff out!), Scissors, Hairclip/comb/ribbon.  Trim of your choice.


Step one.
Take one of your felt hats and scissors.  Start off by cutting the brim of your hat.  Yes, your going to cut your hat into pieces.  After you cut the brim off, make a slit up the side, to the top of the hat.  

Good, now cut the rest of the body of the hat off from the very top of the hat, keeping the top of the hat's circular/oval shape.  So now you have a bunch of hat pieces, right?  This is going to be the pattern you will use for the fabric.  The best part is that after you have cut this one hat up you don't have to cut another one up.  Just keep the pieces and you can make more in the future!

Step two.
After you have chosen your fabric, take the pieces of your cut up hat and proceed to cut your fabric.  Remember to cut the pieces a little larger than your pattern (you can trim it later if needed).  This will insure that your pieces are not too small and that none of the black felt will be visible.

For the brim, I cut two pieces.  One for the top and one for the bottom.  You don't have to do both, its just what I like to do to give a more finished look.  With fabrics that have more give then others, I make the hole on the topside of the brim smaller, where the bottom piece the opening will be the same size as the opening.  The brim on the bottom will be slightly wider than the top piece.  (Hopefully I haven't lost you yet!)


Step three.
Its now time to bring out your glue.  I start with the brim first.  You don't have to, but I think it looks better this way.  Take your uncut hat and apply the glue around the top of the brim.  If using fabric glue, let the glue sit on the hat so that it can get nice and tacky for when you put the fabric on.  Slip the top cover of the brim over the hat and smooth it over the brim, and fold over the extra fabric to the other side of the brim and glue it down.  You can also just cut the fabric if folding it becomes too bulky.  After you have secured your fabric over the brim, again let the hat sit for a while.

This process can be a bit long and tedious, but it is well worth the wait and effort.  After your feel that the glue has dried enough, you can then put the very top piece onto the hat.  Apply the glue on top and them smooth over the fabric.  

The middle section of the hat at this point should still be exposed (except for the bottom of the brim of course).  Take your fabric and glue, and put the glue on the top and bottom edge of the fabric.  Now fold it over so that it looks like you have a clean hem (for those of you who do sew, you can actually hem it!).  After the glue has dried enough on the fabric it is time to go ahead and glue on the middle section.

Your going to wrap the fabric around the hat, making sure that the folded sides are facing into the hat.  One side will over lap the other, this is normal.  This is where I like to do another fold and glue it down, making it appear that there is a seam going up the side of the hat.

Now, if you want to, you can take the bottom brim fabric and fold over the edge, or you can glue the piece on and then trim the edge (I have a feeling pictures are going to make this much easier to understand).  Again, this gives the hat a clean look once you glue the bottom piece.

Step Three is Finally Complete and you now have a fully fabric covered hat!

Step four.
This is where it gets easier.  Before you plug in your glue gun, play around with your trim a bit to find the best look for your hat.  After you have an idea of what you want your hat to look like your ready to start gluing!

Before anything, I like to glue down my ribbon/band around my hat.  After that I will add a bow, flowers, or a pendent to go on the front or side of my hat.  After I have finished with my gluing, sometimes I will add a string of beading onto the hat if I feel that it needs it.  In this tutorial I have chosen a black band, Jeweled black heart, and red feathers.

Step five.
I always add my hair clip or ribbon at the end.  You don't have to go by this example completely, its just how I like to do it.  If you're using a hair clip, I like to make sure that the clip is about the same width as the opening of the hat because the hat will have better support on your head.  I place the clip right in the middle and use the hot glue gun to glue each end of the clip to my hat.  With ribbons you can either sew them in, or glue them.  Its going to be faster and easier to glue, but with sewing you might feel more at ease about how tight you tie your hat on to your head.

And now you have your very own mini top hat!


Wednesday, April 10, 2013

Still Got Legs!

The title doesn't really go with this blog post i don't think, but whovian cares? ;)

Anyway, I am still alive!  I have been working on lots of schoolwork and the fashion show.  YAY!  So if any of you keep up on my Facebook or Twitter, I just got a new Serger!

This is not a long post, this is to just let you guys know I am alive and I will do a serger review after I have finished making my garments for the fashion show.  I will say that I am very happy with my purchase, and it is a Juki brand serger.  It is the same brand we use at school, so that is one of the main reasons why I choose this machine, but also because of the reviews and I wanted something that I could do different things with it.

Anyway, after I fashion show I am going to either post pictures, video, or something...

Okay BYE!!!!!!!!!!

P.S.

You people actually emailed me with some questions!  I'm so excited!  Please don't think I forgot about you, I will make another blog post to address them :)

-PLV

Thursday, February 28, 2013

Dress Chop Preview and Fashion Show!

If you guys have been keeping up with my FaceBook, you know that I made an update about the fashion show my school is having and that I am chopping up more brand!

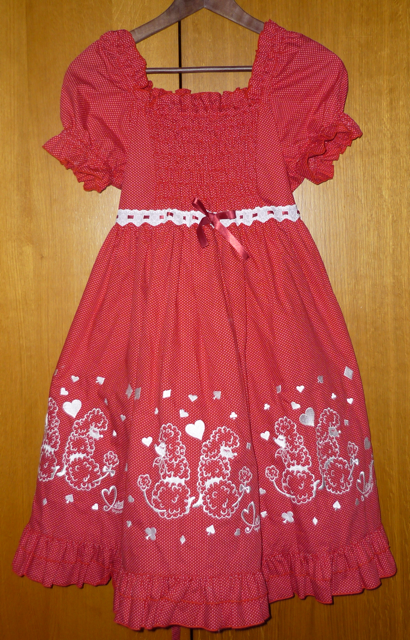
The next dress I am chopping up is a Metamorphose Red Polka Dot Poodle One Piece...  I did not take this picture, I stole it from Google.  I am currently at work and updating my blog on my lunch... so if this is your picture and you want me to take it down, I will but until I get my own picture up I will borrow this.  This is another Dress to Skirt.  I have already taken the zipper out.  It's going to be another elastic waste, but I might go ahead and put the zipper back in so that it has the elastic waste and they can zip it up on the side.  I also plan on making some bows out of the remaining fabric.  I will eventually make updates...  Don't believe in deadlines.

Fashion show!... ok in this case I have to acknowledge the deadline.  May 5th...  I think it's May 5th, my school will be having a Fashion show at the Baltimore Convention Center.  I do not have times yet.  I do know that at this time, the price for Tickets are as follows

Student: $13
General Public: $20

Please note that these prices are subject to change as I do not believe we have started selling tickets, and at this stage, anything could change.  But I will make regular updates, because I want people to come and see what me and my classmates are doing....  I should make a Lolita Event... hmmm...

This Saturday we are also having a Model Call.  I know it is really short notice, but if you live in the Baltimore Area, or are willing to travel, you should come and audition.  Doesn't matter if you have experience or not and we are looking for all ages, and any body types.

March 2nd Looking for models.
Kids ages 5-18 @ 1:00pm-2:30
Adults 18 and over @ 2:30-4:30
Location: Baltimore city community college
West pavilion 3100 Towanda ave
Baltimore MD 21215


Another Note:  If you cannot make it to one time slot but can make it to the other (ex: You are an adult model but can only make it between 1:00pm-2:30pm, and if you are a Kids model but can only get here when the adults are auditioning) then come when you can so long as its before 4:30pm.

Well, that's it from me.  I hope you see some of you there!!!!... I most likely will not be in Lolita, just so you know.

Monday, February 11, 2013

Chopping up Brand

The title is correct. I am subjecting you all to one of my recent commissions.


A friend of mine has brought me three pieces she wishes to have altered. So far I have completed one of these requirements.  As I complete each one I will post pictures on here for your entertainment, and you can leave comments on if you love or hate it. If you do please tell me why :)

For this piece she wanted to turn it into a skirt. For payment I wanted the top half.  So there was not much altering needing to be done. I also made a hat to go with it, and used one of the bows from the top part of the dress.

Saturday, January 26, 2013

Long Time, No Post


I am still alive, just been working and having a lot of me time.  As you know, during the holidays I was in London and then Wales.  I will post pictures later.  Came back home and I am working on altering some pieces for a friend.  And I have to run to the postoffice to Mail out a skirt that I made for a friend.  School starts next week and I am terrified.  First semester went ok, but I am still getting used to going back to school and being a student.  On top of that... my friends and I are starting a youtube channel... kinda nervous about that.  I want to start a Lolita channel, but I am not sure if I am going to have time for all these things I want to do.
For now, I will try to keep updating as much as I can.
Hugs and kisses!
PLV

Tuesday, December 25, 2012

Internships

Hello everyone! I hope everyone is having a wonderful Holiday!

So a week or two ago, my Concepts of design instructor had a surprise for us.  Some of her friends came in to look at our work and discuss internships!  Super sad that at this Stage I cannot do the Internship, but I got to exchange information.  I also wore one of my hats, but I will get into that later.

I wanted to talk about what these men do.  Osei Moreland, he is the owner of Bring the Noise Network.  Ty Canty, President of Fashion for Cancer.  I am seriously thinking about turning around and doing one of these internships.  What these men are doing is great and I strongly feel like I want to be a part of it.

 Fashion for Cancer is a program where people come in and teach cancer patients to make clothes and accessesories.  Then those items are produced and sold online.  I just think that is the most beautiful thing I have heard yet.  I would love to come to New York and do this.  If this is something you feel like you might be interested in doing, I strongly suggest looking into as much information as possible.  I will post links at the end of this post!

The other Internship that is being offered is one in Baltimore working with middle school Children.  Teaching them how to create pieces as well.  I feel like this is a great idea too, exposing kids to this kind of stuff where they can be expressive in what they make.  Middle school can be a really tough time on anyone kids, this could make their day or week, provided that it is something they are interested in.

I wish I could write more for you guys but I am getting ready to fly out to London and see Mason! Will take lots of photos for you guys!

Hugs and kisses

-PLV